 Home
Blog
Projects
About
Contact
Home
Blog
Projects
About
Contact

~8 Minute Read
This post details the approach I took to create a stylised gradient lambert shader inspired by games like VALORANT and Team Fortress 2. The result is meant to lift the black value of a typical lambert model but we do some custom stuff to allow us to remap the values to an arbitrary amount of colours/values.
NOTE: If you're following along and your results differ then it should be noted that the examples were shown in a project not implementing Unreal's HDR Tonemapper and therefore the colours we choose are more accurate to the ones we pick in the gradient. So long as you're on the unlit model and values are clamped between 0-1, it should be pretty similar.
I've been working on a few projects that use various stylised techniques to achieve a unique and interesting look. One of these projects in particular is a small game that requires high performance on old machines with a heavily modified old school look. Whilst retro games typically run well on older hardware with their low poly meshes, low fidelity textures, and low rendering resolution among other limitations, this doesn't always translate super well with modern game engines like Unreal Engine that throw you straight in with advanced rendering techniques that would have been impossible to utilise previously. Even when disabling things like Nanite, Lumen, TSR, and dropping the quality bar of everything in the game, there are two core rendering features that can add up to several milliseconds in frame render time. So much so that we can see hundreds of extra frames per second difference on higher end hardware and this will be similar on the lower end spectrum depending on the various bottlenecks. These are our scene lights and shadow depths.
Obviously, setting the view mode to unlit fixes this but comes at a rather ugly cost. The scene looks completely flat and shadows are missing which makes everything look dull, bland, and gross. So with that all being said, what can we actually do to fix this problem?
After removing all of the elements that light a scene in Unreal Engine such as the directional light, the sky light, and any point, spot, or area lights, we get a completely black scene which is just as bad as flat diffuse colour. The easiest way to make everything unlit is to create a post process shader that only renders the scene texture type (base color, diffuse color). The flat look is still a problem and cannot really be fixed through the post process method, and so instead we need a master material or a material function that can allow us much more control over the meshes in our scene.
(Before we dive into shader magic I should also mention that our shadows are all being done through simple shaped decal volumes. There are several ways you could handle shadows and we only disable them on our meshes for our performance benefit. We still use a directional light and you can enable shadow casting on this if you want to keep those sexy shadows. If you do your custom shadows in a different way, please let me know as I love this stuff!)
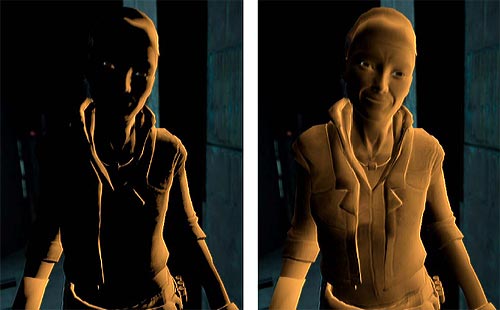
So how do we light this thing without any lights!? Well we can actually do some simple maths that only take in one external variable to determine the light vector (AKA the direction the light is pointing) and use that to figure out a basic lighting setup. There are a few lighting models that could work, but the one that I will be using is the "Lambert" model. A very commonly used one in games and it is incredibly easy to replicate in both shader code and the nodes in Unreals shader graph. I will be doing everything inside of the shader graph but it's just as easy to replicate within HLSL and GLSL. The equation is the dot product between the light vector and the surface direction, or in our case the vertex/pixel normal. That gives us this beautiful result that proves we don't need light casting objects to light a model. And theoretically, you could do this several times to account for several lights in the scene which is essentially the baseline for what most game engines do.

Now we are doing all of this with the unlit shading model rather than creating our own which can bring some unfortunate limitations, such as the inability to easily cast shadows onto the object, and no specular/roughness control. However, we can create our own specular/roughness response later on but we won't be doing this for our project. I shall leave a link to that blog post here.

Now this is the most basic shading we can do and it clearly needs more work to achieve that stylised look. The biggest eye sore is that our shadowed side is completely black and we lose all detail. To mitigate this, we need to clamp the values between x and y where x is a number higher than 0 for the shadowed area and y is the brightness of the light part, although we will keep this at 1 and change it later. And so marks our journey into the custom lambert model.
For games like Half Life and Team Fortress 2, Valve addressed the lambert shading issue with what they referred to as "half lambert". The result is a softer falloff and is great for a much more pleasing look and reduces the mesh details that are lost.
Below is our half lambert shading with 3 values for the shadows starting with 0 which is no half lambert.

Whilst the half lambert model works well at doing what we set out to create, my project deals with constantly changing lighting scenarios when going into different areas and therefore I needed much more artistic control over the colouring of the light. One potential way of doing this is through a simple colour linear interpolation that uses the result of the lambert as the alpha. This works really well and allows us to tweak the values and colouring of the light and dark parts of the shading. Unfortunately, this means we are limited to 2 colours which in most cases will be fine. Instead of using a ton of if statements for individual values which is common in toon shading tutorials (which hurts my soul), we can get a bit more creative with this.
Introducing VALORANT, the tactical 5V5 shooter from Riot Games that is powered by a modified Unreal Engine build. Brandon Wang worked on the character shaders for the game and talks in a blog post about the necessity to have a balance between something that looks good, performs well on very old hardware, and maintains competitive integrity. Whilst my game is not a competitive shooter, I was intrigued by the shader work done on VALORANT esspecially considering the engine that the game runs on. The character shader that the game uses features "Gradient Lambert", a technique that involves taking the clamped output of a standard lambert function and then remapping that 0-1 value to a colour gradient. That sounds almost way too simple to actually just work right? Well actually it kind of is, so let's have a look at replicating this inside of the shader graph.

The quickest and easiest way to do this is by first making a simple lambert function, clamping the output between 0 and 1 again and then feeding that into a curve which maps colours to a "time" value. How do we use a gradient/curve inside of the shader graph? We first create a curve asset and define it as a linear colour one. From there we can set our first colour to black at time value 0 and white at time value 1. Then, we create a "curve atlas" asset and set our curve as the one used in the atlas before adding the curve atlas to our shader graph and plugging the lambert model into the time input. It should look the same at first but if you go back into the curve and start either moving the values or changing the colours, you should see that your model starts getting shaded accordingly. Now we can add as many points on this curve as we want and move them around to affect the falloff of each colour. That's pretty much the technique that is being used in VALORANT although they have more complex features added in that helps solidify their style and optimise it for a competitive environment.

This is some of the examples I created for this demonstration, the outline effects on the toon shaded ones are an extra step that are added afterwards. The toon shaded style is a result of crunching the colour values super close together in the gradient.
There are several ways you could expand upon a shader like this to fine tune it for your needs. We already have the ability to have a limitless amount of colours and values with varied fall offs so what else could we add? Well for my game, we expanded upon the initial lambert model by adding offsets and attentuation to the shadowed area, as well as adding support for multiple light hits, a "fractured gradient" effect (splitting up a smooth gradient into more harsh sections of values/colours), and then adding more indirect factors like affine warping, vertex distortion, and modulation of the entire mesh when an 'entity' gets hit. Furthermore, the light vector we use in the function can either be set up through a static vector, dynamic value, material parameter collection value, or even using the "atmosphere sun light vector" node which will do the very handy job of reading the direction of an actual directional light. Keeping on the lambert model, since we are simulating global illumination on the character, we could also set up zones that switch the shadow colour into the ambient lighting of that area or even find a way to sample the colour of the surrounding area.
There's a near infinite amount of possibilities for expansion and I hope I've given you some ideas on how you can make your stylised games more visually intriguing.
Earlier I mentioned that we removed all of the lights from the scene to improve performance but this is a pretty niche performance restraint and isn't necessarily needed to keep high performance. Since we make our own shadows using decals, we never need shadow casting lights and so the cost of a dynamic light in the scene is only dependent on how many pixels it affects which is great considering the resolution the game runs in. The only problem is that these lights will never affect anything using the shader we made since it's an unlit shading model. As you probably expect, we can move back to a lit shading model and so long as the regular specular value remains as 0, we can have lights affect our mesh whilst keeping that same style.
We can basically count this as free lights but we unfortunately gain more instructions and complexity on the shader. So is there a way to use the unlit model and have other light contribution without a custom lighting model? Well kind of but it either needs to be set up so each possible light is set up or you'd need to find a way to iterate through all of the lights that affect the mesh (of which I have not tried anything with the latter). The former can be annoying to set up depending on how many dynamic light sources you'd like emitting on your objects, and how you would pick which lights affect the mesh is another story. From what I understand, VALORANT uses static placed lights that are completely free and then sample cached indirect information from them to determine ambient lighting.
For my game, we use a simple two light mix. This includes the main directional light and one extra light we can manipulate based on the scenario. For example, we usually find the nearest light with a dynamic tag and feed the properties of that into the second light properties in the shader. Then we basically recalculate the lambert function with some tweaks and add it to the end result.
So that's pretty much it, this style of shader has really pushed me towards focusing on technical art and ensuring my projects have nice artistic visions and balances. There's a lot of potential here for your own expansion and experimentation and it's things like this that can really give a game a unique look and feel. As I work on more shaders that I think are interesting enough, I will post them within blog posts however the majority of them can just be found in the projects section of my site. Thank you for taking the time to read this and I hope that you've found this informative and helpful for those who want to create something similar.